


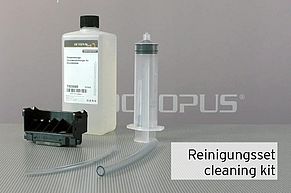
Cleaning kit with nozzle cleaner fluid and tube adapter for Canon print head
Thanks to thoughtful feedback by our customers we have updated our cleaning approach for a Canon print head and now offer the cleaning kit with nozzle cleaner plus the suitable tube adapters to flush the print head´s nozzles.
Our cleaning kit for Canon print heads consists of our nozzle cleaner fluid, a big refill syringe and two tube adapters fitting the ink ports in the print head. The nozzle cleaner kit enables You to clean Your Canon inkjet printer´s clogged print head either inside or outside the printer. The tube adapters are suitable to be applied on the round shaped ink ports of Canon printers using single inktank cartridges.
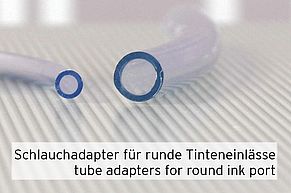
The print head inside the Canon printer device, using single ink tank cartridges, has a specific position for each of the cartridges. In each of these positions there is an ink port in the bottom plate. The cleaning kit is made to be used on the round shaped ink port version. The round ink ports have two different sizes. The big ink port is in the position for the pigmented Canon PGI cartridge. The smaller ink ports are for the smaller CLI cartridges. So that means in detail the big tube adapter fits the big PGI ink port and the smaller tube adapter meets the diameter on the smaller CLI ink port inside the Canon print head.
![[Translate to Englisch:] Tinteneinlass runde Form im Canon Druckkopf](https://www.octopus-office.de/info/fileadmin/_processed_/7/d/csm_02-tinteneinlass-canon-druckkopf_a5fca75fa9.jpg)
![[Translate to Englisch:] Adapter für PGI Tinteneinlass sowie CLI Tinteneinlass](https://www.octopus-office.de/info/fileadmin/_processed_/3/9/csm_02-adapter-PGI-CLI-port_cc48b5ee58.jpg)
There is a flat seal installed around each ink port. For cleaning the Canon print head´s nozzles from the ink ports side we recommend to take out these seals. Please keep them for later use. Without these seals there is more room available on the ink port´s protuding part to slide the tube adapter on. This way the tubes have a better friction fit on the port. The tube adapters are installed on the ink port by pressing them straight onto the ink port and turning them a little. It helps to wet the tube´s ending that should be pushed on the port by using a bit of nozzle cleaner. In case You are going to clean a Canon print head while it is installed in the printer use small pliers to push the tube on the ink port.
![[Translate to Englisch:] Dichtung um Tinteneinlass im Canon Druckkopf](https://www.octopus-office.de/info/fileadmin/_processed_/9/f/csm_03-dichtung-canon-druckkopf_a9983b68b7.jpg)
![[Translate to Englisch:] Anbringen des Schlauchadapters am Tinteneinlass](https://www.octopus-office.de/info/fileadmin/_processed_/f/4/csm_03-adapter-tinteneinlass-anbringen_06e1228091.jpg)
How to connect the tube adapters to the refill syringe? The refill syringe is equipped with a Luer Lock connector. As the tube adapters have different inner diameters, they get connected to different parts of the Luer Lock connector. The small tube adapter fits on the tip located on the center of the Luer Lock connector. And around that central piece there is round rim. The big tube adapter for the PGI ink port fits over that outer rim and is pushed over it.
![[Translate to Englisch:] Anschluss des Adapters für Canon CLI Tinteneinlass an der Refillspritze](https://www.octopus-office.de/info/fileadmin/_processed_/a/5/csm_04-adaper-cli-tintenpatrone_9d7def055b.jpg)
![[Translate to Englisch:] Anschluss des Adapters für Canon PGI Tinteneinlass an der Refillspritze](https://www.octopus-office.de/info/fileadmin/_processed_/0/f/csm_04-adaper-PGI-tintenpatrone_2ce0dcdb9e.jpg)
To clean the nozzles on a Canon print head we recommend to go the least invasive way as possible. The print head is a very sensitive and expensive component. Our suggested method for cleaning escalates in three steps. In the first step we mount the tube adapter on the ink port. In the demonstration it is the ink port´s big version for the PGI cartridge. Below the print head´s nozzle plate we lay out a folded sheet of paper towel and a sheet of a plastic foild material. The paper towel is there to absorb cleaning fluid coming out from the nozzles and the plastic sheet protects the surface of Your working area from beeing polluted by the cleaner mixed with residual ink going through the absorbent paper. Now we fill some print head cleaner fluid into the mounted tube adapter. The first cleaning step is very gentle - we let the nozzle cleaner sit ontop of the ink port and give it time to enter the print head´s insides to dissolve cloggings or dried residual ink. The absorbent pad below catches the polluted cleaner that exists the print head.
![[Translate to Englisch:] Setup für schonende Druckkopfreinigung Canon](https://www.octopus-office.de/info/fileadmin/_processed_/f/4/csm_05-canon-druckkopf-schonreinigung_ecf48118ae.jpg)
![[Translate to Englisch:] Zeit zum einwirken des Düsenreinigers auf den Tinteneinlass](https://www.octopus-office.de/info/fileadmin/_processed_/d/7/csm_05-duesenreiniger-einwirkzeit_e1799d1671.jpg)
The second cleaning step can be applied if the result of the first step does not reach the expectations. Therefore the refill syringe is connceted to the tube adapter. There should be some nozzle cleaner in the tube adapter and make sure that the syringe contains an amount of air. When the connection between tube and syringe has been made You can start to pump the syringe´s plunger carefully. Pressing in the plunger presses the nozzle cleaner into the ink port and further into the print head´s ink system. The pumping, meaning pressing the plunger in and letting it go again repeatedly, creates some kind of circulation of the nozzle cleaner. This speeds up the process of dissolving existing cloggings. The air in the refill syringe acts as some kind of damper. It helps to build up pressure towards the printer´s nozzles very gently.
![[Translate to Englisch:] Reinigung Canon Druckkopf mit Refillspritze](https://www.octopus-office.de/info/fileadmin/_processed_/d/3/csm_06-duesenreiniger-einpressen_23e312dc16.jpg)
![[Translate to Englisch:] Druckaufbau durch Tinteneinlass am Druckkopf mit Refillspritze](https://www.octopus-office.de/info/fileadmin/_processed_/5/a/csm_06-druckaufbau-refillspritze_4d0e2bac9f.jpg)
By pumping the cleaner fluid into the Canon print head we aim to make use of the surfactants in the nozzle cleaner. They allow the water based cleaner formula to dissolve dried in cloggings and make room for the ink during printing again. The way from the ink port to the nozzles is going through again when You can see that the not so clear anymore cleaner fluid is coming out at the nozzle plate at the bottom. The cleaner is absorbed by the paper pad there.
![[Translate to Englisch:] Gemisch aus Druckkopfreiniger und Tinte tritt an Düsenplatte aus](https://www.octopus-office.de/info/fileadmin/_processed_/d/7/csm_07-duesen-durchgespuelt-Canon_909bb05939.jpg)
The third cleaning step aims at getting rid off really sturdy cloggings in the Canon print head. That means applying pressure towards the nozzles using the refill syringe was not able to free the ink system from its inlet ports to the nozzle plate. Now we approach the print head from the bottom side. Put some print head cleaner fluid into a flat bottomed container. It is sufficient when the cleaner level is one to two millimeter high. Place the print head with its nozzle plate into the cleaner liquid. Here the situation is the same again - time is the key - let the print head sit in the cleaner for one to two hours. The print head cleaner will migrate into the nozzles and work on the cloggins from this side. You can check on the progress of the cleaning by pressing the nozzle plate on a piece of paper towel. You should be able to see a print of the row of nozzles that You intend to clean.
![[Translate to Englisch:] Druckerdüsen einweichen von Düsenplattenseite her](https://www.octopus-office.de/info/fileadmin/_processed_/b/c/csm_08-duesenreinigung-Canon-du_cab844c4ae.jpg)
![[Translate to Englisch:] Kontrolle Fortschritt der Druckkopfreinigung mittels Abdruck Düsenplatte](https://www.octopus-office.de/info/fileadmin/_processed_/c/9/csm_08-kontrolle-fortschritt-druckkopfreinigung__2__4e5b06fcf6.jpg)
Finally it useful to do a complete rinsing of the ink system. Therefore the tube adapter is attached to the ink port and filled with some cleaner fluid again. When the system is free the level of the cleaner inside the tube adapter is dropping constantly as the absorbent underlay creates a suction effect and draws out the liquid. If that is not the case You can also connect the refill syringe to the adapte again and push cleaner through the print head to flush out remaining particles. Please be careful and avoid pushing air from the syringe into the print head.
After the cleaning there will remain some print head cleaner in the print head. The best way to remove this cleaner is to print it out after putting back the seals to the ink ports and installing the inkjet cartridges again. Print some test pages until the print out quality is back to normal.
![[Translate to Englisch:] Spülung Tintensystem von Tinteneinlass zur Düsenplatte](https://www.octopus-office.de/info/fileadmin/_processed_/8/6/csm_09-tinteneinlass-spuelen-Canon_13b8193a85.jpg)
![[Translate to Englisch:] Gereinigte Farbe wieder frei bis hin zur Düsenplatte des Druckkopfes](https://www.octopus-office.de/info/fileadmin/_processed_/6/b/csm_09-tintensystem-durchgaengig-bis-duesen_ed92b76721.jpg)

 Print Head Cleaner set for Canon Pixma, Nozzle Cleaner with extension hoses
 Nozzle Cleaner, Print Head Cleaner
 100 ml Kit Nozzle Cleaner, Print Head Cleaner
") Purified Water, de-mineralized and de-ionized (iter)
Purified Water, de-mineralized and de-ionized (iter)